
Part of the renowned Sandestin® collection, Burnt Pine is a stunning golf course designed by Rees Jones. It’s well located in Miramar Beach, Florida, and being part of the Sandestin Golf and Beach Resort® means that it benefits from luxury amenities and recreational facilities along with three other picture-perfect golf courses. Highway 98 is just minutes away and the course is well-served by airports such as Northwest Florida Beaches International Airport (ECP), Northwest Florida Regional Airport (VPS), and Pensacola International Airport (PNS).
Whilst well connected to air and road links, the course offers a tranquil oasis and gives the feeling of being a million miles away from the hustle and bustle of daily life.
The beautifully landscaped grounds leading up to the clubhouse are a testament to the course and the clubhouse itself. There are a variety of options to choose from when dining, and whether having a meal inside the contemporary clubhouse or on the beautiful, covered terrace overlooking the course, you’ll certainly be spoiled for choice.
As part of the Sandestin® collection, Burnt Pine is served its own pro shop as well as by two additional pro shops located at the neighboring Raven and Links courses. With a choice of three pro shops, you’ll be sure to find exactly what you need whether it be the latest apparel or some new clubs to add to your arsenal. If you need to rent some clubs, you can expect the best quality with 2022 Callaway Roque wrons, Epic woods, and an Odyssey putter making up your rental set, for only $70.
The high quality of this establishment flows into the practice facilities, with an excellent driving range, short game practice area, and multiple putting greens.
The staff at Burnt Pine are well trained and passionate about the game, so whether it be a tune-up you need from one of the professional instructors or advice from the pro shop on which wedge you could benefit from most, you can rest assured that you’ll be covered.
The course at Burnt Pine has a 74.8-course rating and slope index of 148, and the majestic course measures around 7000 yards, par 72. The course has been well thought out and designed, providing a great challenge to even the most experienced golfers. However, from the front tees, it’s not too intimidating so definitely a course that a higher handicapper could enjoy too. The course is made up of ten par 4s, four par 5s, and four par 3s.
The shortest tees are the reds, followed by whites, blues, and the longest, the yellows.
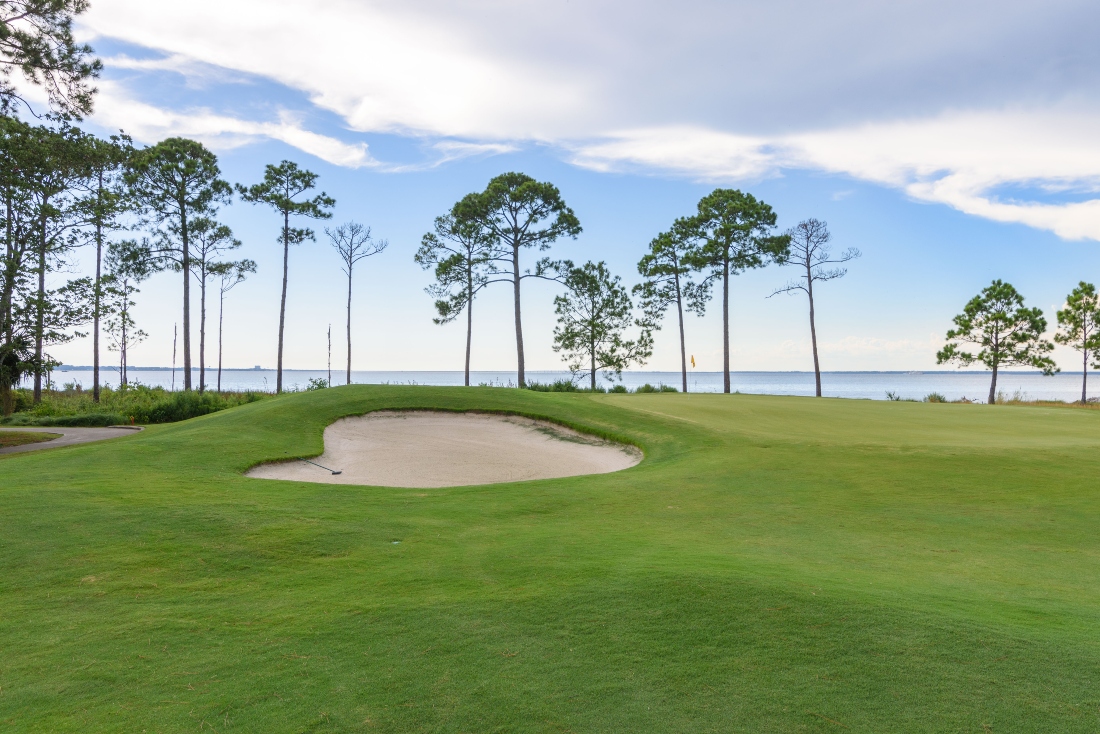
Each hole at Burnt Pine has its own character, and the course features an eclectic mix of water, trees, and marshland. The holes on this course provide a great challenge with many requiring a tee shot over the water, along with a mixture of both fairway and greenside bunkers. The bunkers themselves vary in depth, size, and shape which means no two bunkers are the same. Another great feature of the course is the rolling fairways and the greens on several holes are multi-tiered. This is a great challenge for golfers strategizing on how to land the ball on the “right” part of the green and certainly provides some interesting putting scenarios.
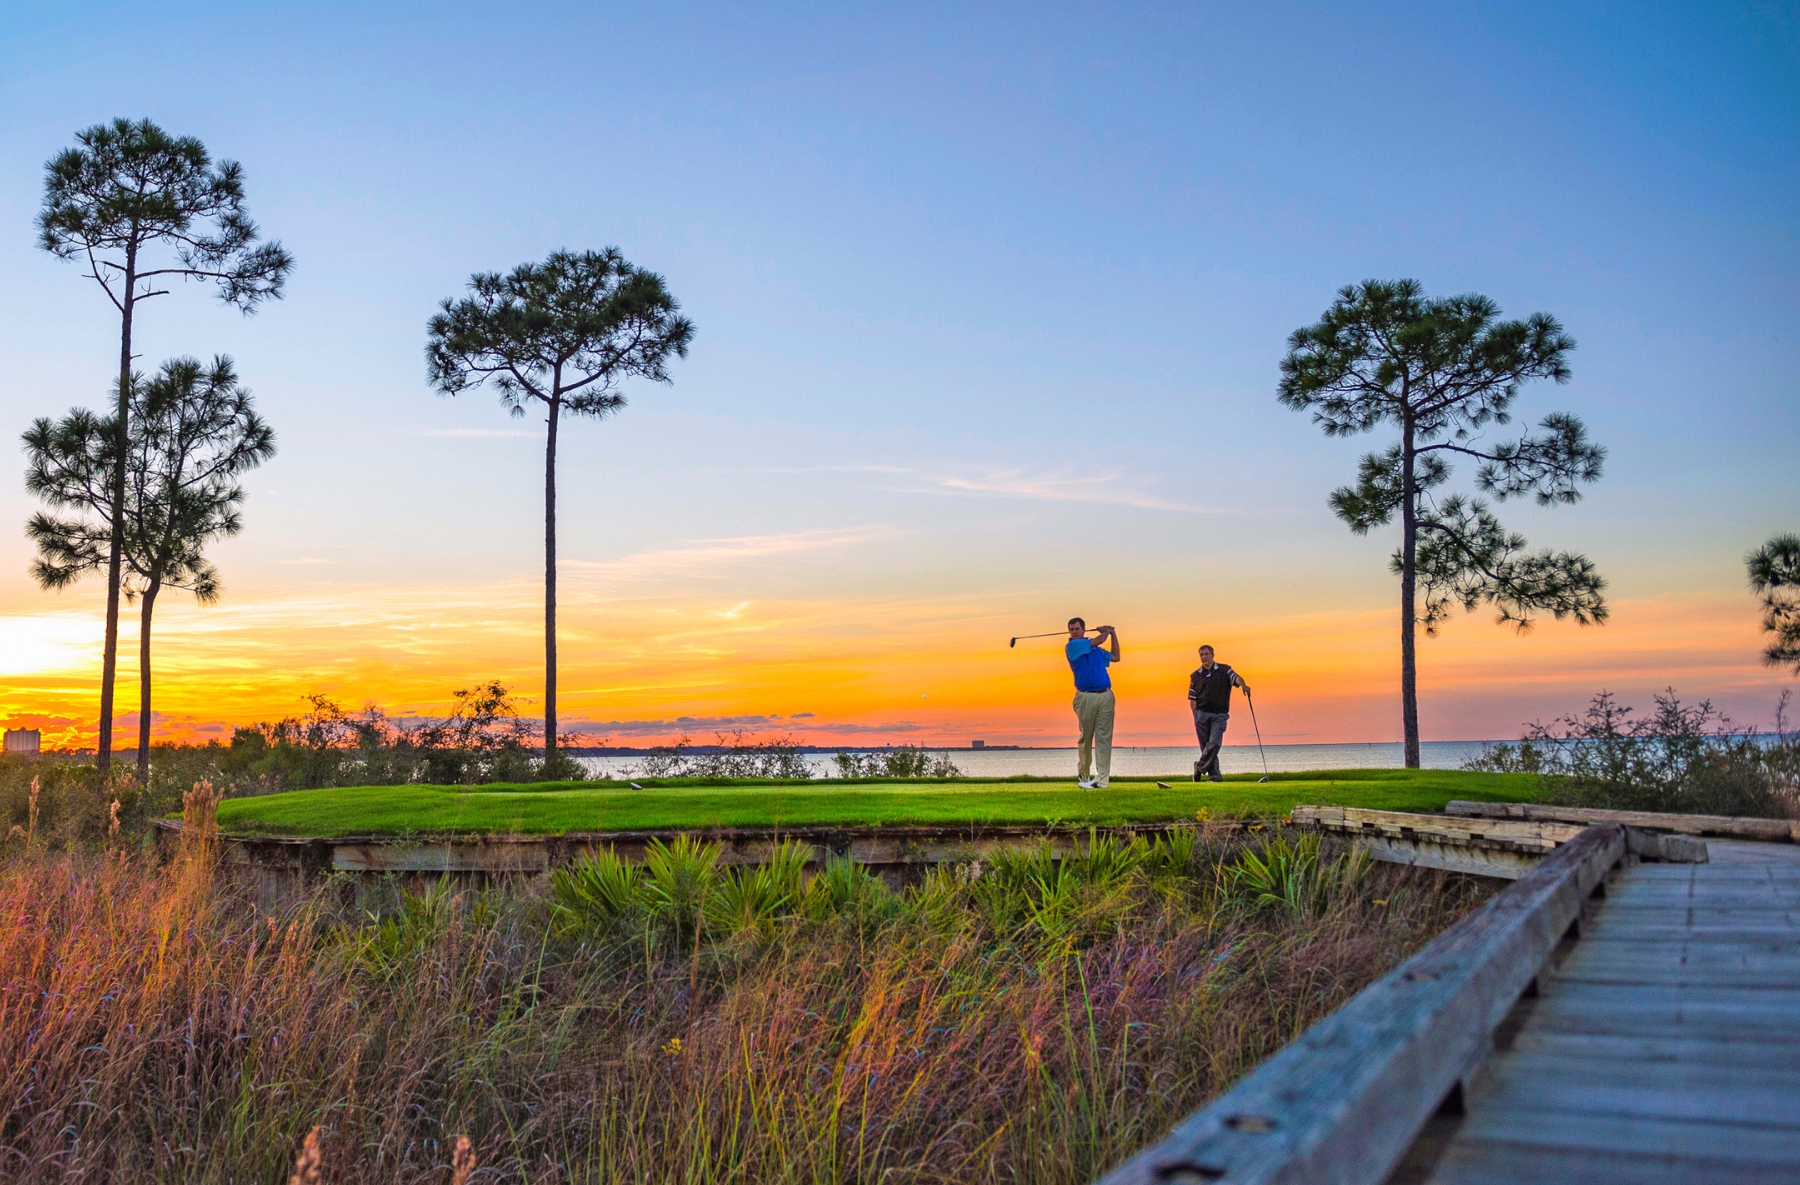
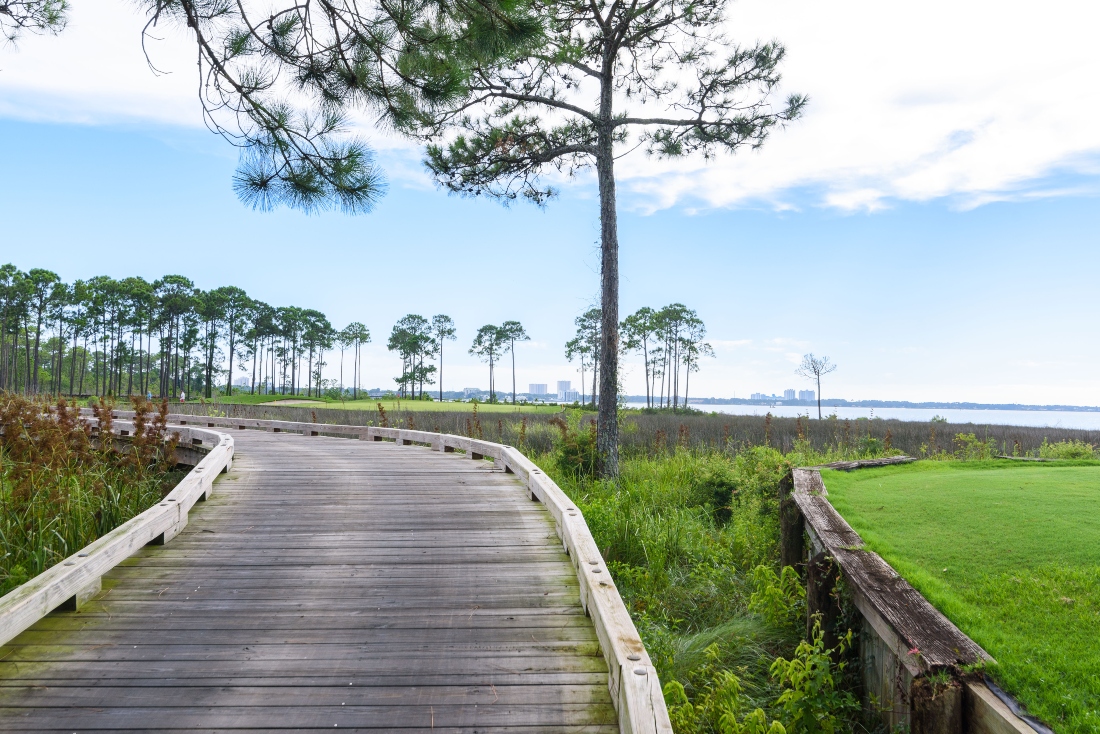
Variety would be an understatement, with golfers taking on the Emerald Coast’s wetlands and pine forests in the front nine, with the back nine offering a visual feast, providing views of Choctawatchee Bay as a backdrop.
The beautiful course was designed by renowned golf architect Rees Jones. Famous for designing world-class golf courses both in America and abroad, Rees Jones and his team have created something truly special here at Burnt Pine.
It’s no surprise then, that Golf Magazine called the course the “Crown Jewel of Florida Golf” and it has consistently ranked within the Top 20 “Florida Best Courses You Can Play” by Golfweek since 2016.
Hole 1 – Par 4 355 Yards
The opening hole at Burnt Pine is a picturesque par 4, but golfers shouldn’t be fooled by its beauty. Teeing off from the blue and yellow tees means that the water hazard to the left of the hole comes into play. The good news is there is a generous-sized fairway to land your tee shot. With a fairway bunker to the left-hand side of the hole, golfers should aim for the middle to right-hand side, giving a good angle of attack into the green. While the fairway is a generous size, the green is tight and closely guarded by a bunker on either side.
Hole 2 – Par 5 548 Yards
The second is a long par 5, with it coming in at 569 yards from the yellow tees right at the back.
While going for the green in two isn’t impossible, it’s a difficult one for even the longest hitters. You would need at least 300 yards off the tee which would still leave you with a 248-yard shot into the green. It’s one of those par 5s that’s best to play to the green in three shots, especially when you look at how narrow the fairway is. The first patch of fairway, which is a great landing spot for your tee shot has two fairway bunkers on either side so accuracy is important here. The layup shot isn’t particularly straightforward as there are three fairway bunkers to the right-hand side and one humungous bunker running up the left-hand side of the hole.
The top part of the bunker serves as a greenside bunker to the left and there are two smaller bunkers to the right leaving little margin for error.
Hole 3 – Par 3 161 Yards
With the previous hole being a challenge, to say the least, it’s comforting to have a less taxing hole with the par 3 third. Although it also has a huge bunker flanking the left-hand side of the hole, there is a reasonable-sized green to play into as well as a bit of fairway, which will catch any short shots. This should allow a relatively simple up and down to save par from this position if you find yourself a club short.
Hole 4 – Par 4 420 Yards
This hole is a tricky par 4 as there are several parts to the fairway which are slightly raised, which could leave you with a shot with the ball above your feet. The hole has a total of three fairway bunkers and four greenside bunkers so shot placement is important here.
")
")
Hole 5 – Par 5 491 Yards
The par 5 fifth is another glorious hole, but the need to clear the water with the opening tee shot means this hole is certainly no walk in the park. With three fairway bunkers awkwardly placed you have to get your tee shot right from a yardage perspective. Because the fairway bottlenecks here and has the bunkers on either side, you either need to be short (but not too short!) of this mark or be able to clear these traps comfortably. If you get your tee shot right and clear the traps you are rewarded with a decent landing spot but any mis-hits will be caught by the fairway bunker or heavy rough to the right-hand side.
Compared to the first par 5 it’s a more “gettable” one to go for in two but it’s a high risk. There is water and a greenside bunker to the left, along with a large greenside bunker to the right.
Hole 6 – Par 3 188 Yards
The second par 3 at Burnt Pines is a long one, running at 188 yards from the blues and 202 yards from the back tees. Again, there is a large body of water all the way down the right-hand side and a good tee shot is needed here. But, there is a safety net in the way of a decent fairway to catch any straight shots that don’t quite reach the green. The green itself isn’t perfectly flat so an up and down isn’t guaranteed from this position. You don’t want to be long as this will mean ending up in the sand trap behind the green, and any pulled shots are likely to end up in the large bunker to the left of the hole.
Hole 7 – Par 4 404 Yards
The first thing that hits you on this hole is the heavily guarded green. There are a total of six greenside bunkers perfectly spaced out around the hole ready to swallow any inaccurate approach shots. The first half of the hole is relatively forgiving, with just two fairway bunkers on either side, so it’s a good idea to maximize this and give yourself a good angle of attack into the green.
Hole 8 – Par 4 334 Yards
One of the shortest par 4s on the course, even from the yellow tees it’s only 356 yards. That doesn’t mean it’s a straightforward hole, however, as it’s a slight dogleg left and the green sits in a raised position. Bearing this in mind, any approach shots landing short of the flag are likely to roll back down onto the fairway leaving you with a tricky up and down.
Hole 9 – Par 4 364 Yards
The ninth is another par 4 running at approximately 364 yards from the blue tees. It’s another hole that requires a strong tee shot over the water, but with a wide fairway, it’s not too daunting. A multi-tiered green awaits, and with bunkers to the front right and behind the green combined with water to the left, precision is required here. Ideally, you’d want a good-length drive leaving you with a wedge into the green for accuracy.
Hole 10 – Par 4 371 Yards
Hole 10 is very similar to the previous hole, another par 4 of a similar distance. The fairway width is similar but does narrow towards the middle. A fairway bunker awaits slightly errant tee shots and it could prove to be a tricky exit from here with a high lip. In other words, don’t be deceived by the size of the actual bunker itself.
Hole 11 – Par 4 342 Yards
Although not long by any means and a straightforward tee-to-green layout there are a total of seven bunkers on this hole. There’s one to the middle left of the fairway and three to the right strategically spaced out as the hole progresses. Avoiding these is just the first feat as the three greenside bunkers are waiting for a stray approach shot. There are your “standard” left and right greenside bunkers, but also one just short of the green so any straight but short shots will mean ending up in the sand. Be careful not to take too much club either as the ending up in the rough behind the green will leave you with a tricky chip.
Hole 12 – Par 3 139 Yards
A picturesque par 3, the 12th is a 139-yard par 3 over the water. Don’t let its beauty fool you, as there are two huge bunkers to contend with and of course the water hazard. It’s easy to overcompensate here by playing to the left, but this could mean ending up in the rough with a tricky downhill shot toward the flag. It’s a difficult hole even from the red tees right at the front. Running at 97 yards from the Reds, although you don’t have to play over the water the front bunker has to be cleared, and too much club means being caught out by the rear bunker.
Hole 13 – Par 4 408 Yards
A dogleg right, the 13th has a generous size fairway which you should take advantage of and play a slight fade if possible. This will leave you without too much distance into the green where yet again, accuracy is crucial. It’s a two-tiered green with a bunker to the left and one to the front right. Do watch out though as the bunker borders the water hazard, meaning a heavy slice could end up with your ball in the water.
Hole 14 – Par 3 193 Yards
It’s safe to say that this is possibly the most difficult par 3 on the course. Not only is it the longest par 3, but it’s certainly not forgiving either. For the yellow tees at the back, it’s 212 yards and blues are 193 yards, and to complicate matters it’s yet another tee shot over water without any room for error with the green positioned right on the edge. There is a patch of fairway to the left of the green but it’s small, along with a greenside bunker situated at the back. Club selection is difficult here as you must clear the water but also want the ball to be able to slow down and stop without running into the bunker or heavy rough.
Hole 15 – Par 4 363 Yards
The 15th has a narrow fairway which becomes even narrower as the hole progresses. One must clear the heavy marshes which are right in front of the tee box but also be mindful of the two large fairway bunkers on either side, as well as the water to the right-hand side. On this hole, the yellow tees right at the back are almost 100 yards behind the blues, and golfers playing from here have a second patch of thick rough to clear on the way to the fairway. For the other tees, a long iron or rescue club is advisable as there really isn’t much margin for error with such a narrow fairway. The green is also multi-tiered and well-guarded with two bunkers, so trying to avoid putting from the top tier or landing in one of the bunkers is a priority here.
Hole 16 – Par 5 489 Yards
After a series of par 4s and 3s, we finally come to another par 5 at the 16th. It’s yet another slight dogleg right with five fairway bunkers and one greenside bunker. The first two bunkers are to the right and left respectively, awaiting a sliced or pulled tee shot. It’s another hole where the first part of the fairway bottlenecks, so it’s a good idea to land your tee shot before this point and layup at a point where the fairway opens up again slightly. Those wanting to lay up closer to the hole must watch out for the water which runs down the right-hand side of the entirety of the hole. At the same time, there are four bunkers on the left for those overcompensating for the water to the right. It’s a small green on this hole so again accuracy is key.
Hole 17 – Par 4 357 Yards
The last par 4 runs at 357 yards and while it doesn’t exactly require a tee shot over water completely, the water comes into play if your shot is to the right. There is a good size landing spot on the right-hand side of the fairway but again you need to be mindful of the water. Trying to completely avoid the right side could mean ending up in the fairway bunkers or trees which hug the left-hand side of the hole. There are a further 3 greenside bunkers to the left of the hole and the water to the right-hand side so there’s little margin for error here.
Hole 18 – Par 5 547 Yards
The final hole of this stunning golf course is a long par 5, running at 547 yards from the blue tees. While there is no water to contend with, there are trees bordering both sides as well as behind the green. The fairway is narrow on this hole, and getting the ball to land at the point where it’s slightly wider means having to carry the heavy rough and four separate fairway bunkers. Once you’ve passed this point, there is another fairway bunker to the right along with two large greenside bunkers to the front. That’s not all; there are three further bunkers to the left of the green as well.
Before you even step onto the first tee, it’s apparent why Burnt Pine has received so many awards and recommendations from reputable bodies such as Golf Digest, Golfweek, and Golf Magazine. The stunning manicured grounds and botanical gardens-style feel surrounding the clubhouse puts you at ease and in the perfect mood to play a round of golf.
The name Rees Jones is synonymous with golf courses of excellent quality and jaw-dropping beauty, and Burnt Pine is a testament to this. The well-thought-out mixture of holes with water that come into play and those where it doesn’t but other traps await makes for a challenging and exciting round of golf.
The clubhouse is the nucleus of this lovely course, and its wide range of dining choices for a post or pre-match meal means you won’t have to look elsewhere. The beautiful covered terrace which overlooks the course is the perfect setting for some drinks after your round.
The practice facilities available are perfect for golfers to tune up their game or even have a lesson, and the excellent instructors can help you make the improvements you need to make your round even more memorable. With several pro shops serving Burnt Pine, there will certainly be no shortage of choice from the latest apparel, clubs, and accessories.
When you consider the high-quality facilities, expert design, and just pure quality of the course and surrounding it’s no surprise that golfers return to Burnt Pine to take in all its glory.


